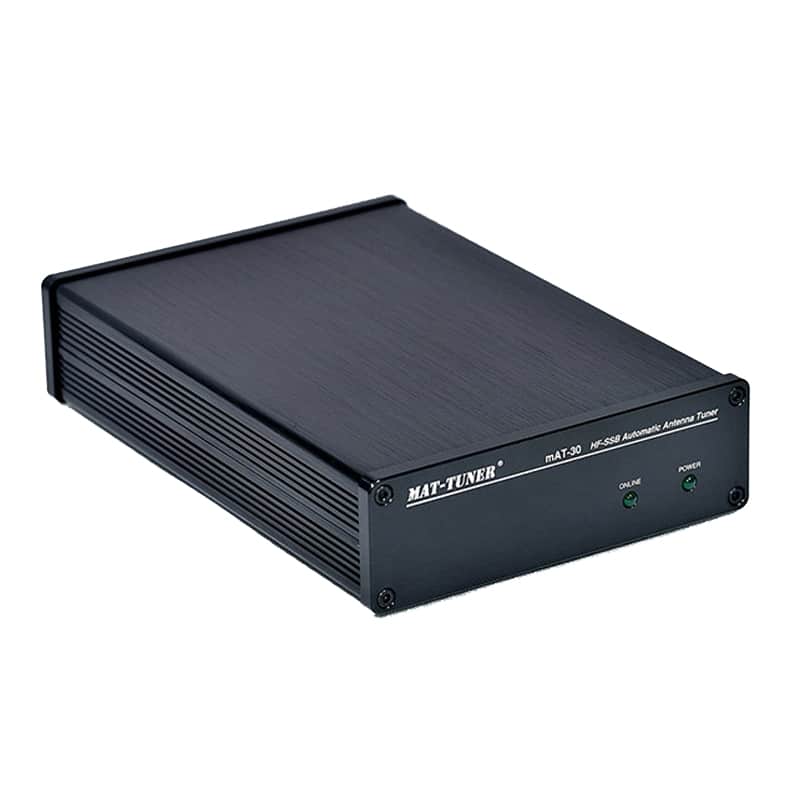
MAT 30 120Watt Automatische tuner voor Yaesu
De MAT 30 is een automatische tuner voor alle moderne Yaesu transceivers. Passend o.a. op de FT-100, FT-857D, FT-897D, FT-450D, FT-891, FT-950, FT-991, FT-991A, FTDX-10, FT-710, FTDX-3000.
100Watt SSB en 30Watt Digitale modes (neem voor 100Watt digitale modes de MAT Y200).
Wordt geleverd met Yaesu stuurkabel.
Let op sluit LDG en MAT tuners alleen aan als er geen stroom op de transceiver is aangesloten!
Specificaties:
0,1 bis 120 W (SSB und CW PEP, 30Watt FT8,PSK/digitale modes) Neem voor 100W digi modes de MAT Y200.
1,8 bis 54 MHz
16.000 Memorys
Afstemtijd: 0,1 tot 5 Seconden
Afmetingen: LBH 20x13x4cm
Gewicht: 0,8 kg
In de doos:
Tuner mAT-30
Stuurkabel voor Yaesu transceivers(2 x 8pol. MiniDIN)
De MAT 30 is een automatische tuner voor alle moderne Yaesu transceivers. Passend o.a. op de FT-100, FT-857D, FT-897D, FT-450D, FT-891, FT-950, FT-991, FT-991A, FTDX-10, FT-710, FTDX-3000.
100Watt SSB en 30Watt Digitale modes (neem voor 100Watt digitale modes de MAT Y200).
Wordt geleverd met Yaesu stuurkabel.
Let op sluit LDG en MAT tuners alleen aan als er geen stroom op de transceiver is aangesloten!
>>
At present, the mAT-30 does not support FT-817/818. If you operate them, you can choose another tuner: mAT-10, which is specially designed for QRP transceivers and perfectly supports FT-817/ 818 and other QRP devices.
The mAT-30 connects to the transceiver via its CAT/LINEAR jack to control the tuning cycle, the transceivers Tune button controls the tuner. The CAT/LINEAR jack also powers the tuner, so it requires no external power supply. Tuning is performed when the TUNE button is pushed on the front of the transceiver and held for one second.
The mAT-30 can work within the range of 1.6MHz to 54MHz, at power levels up to 120 watts. It will tune dipoles, verticals, Yagis, or virtually any coax-fed antenna. It will match an amazing range of antennas and impedances, far greater than some other tuners you may have considered, including the built-in tuners on many radios.
The mAT-30 has 16,000 frequency memories. When tuning on or near a previously tuned frequency, the mAT-30 uses "Memory Tune" to recall the previous tuning parameters in a fraction of a second. If no memorized settings are available, the tuner runs a full tuning cycle, storing the parameters for memory recall on subsequent tuning cycles on that frequency. In this manner, the mAT-30 "learns" as it is used, adapting to the bands and frequencies as it goes.
The mAT-30's control cable mAT-CY provides control signals between YAESU transceiver and the tuner. As the figure shows, the control cable have two mini-DIN 8-pin plugs. mAT-CY can also be used by mAT-10 to link YAESU FT-817/818. Push and hold the transceiver's [TUNER] button for two seconds to start the tuning process. Push [TUNER] quickly to bypass the tuner.
The supplied transceiver control cable is 50 centimeters long. If it is desired that the mAT-30 is positioned farther from the transceiver than this cable length allows, a custom cable will need to be constructed. This can be accomplished in two ways: Cut the supplied cable and solder a jumper wire between all the connections, or purchase new connectors and cable to construct a custom- length control cable from scratch.
Download Instruction Manual (V3.0)
Download Brochure (V1.0)
Yaesu Transceivers Set:
FT-857/857D
1. Press and hold in the [FUNC] key for one second to activate the Menu mode.
2. Rotate the SELECT knob to recall Menu Mode No-001 [EXT MENU], then rotate the DIAL to change the setting to "ON" to enable the extended Menu Mode.
3. Rotate the SELECT knob to recall Menu Mode No-020 [CAT/LIN/TUN]. The default setting for this Menu is "CAT". Rotate the DIAL to change the setting to "TUNER".
4. Press and hold in the [FUNC] key for one second to save the new setting and exit, then turn the transceiver off.
5. According to the operation manual, connect the RF and data connection between the tuner and transmitter.Do not set up the mAT-30 and FT-857D before changing the Menu Mode, item No-020 [CAT/LIN/TUN].
6. Press and hold in the [FUNC] key for one second to activate the Menu mode.
7. Rotate the SELECT knob to recall Menu Mode No-085 [TUNER/ATAS]. The default setting for this Menu is "OFF". Rotate the DIAL to change the setting to "TUNER".
8. Press and hold in the [FUNC] key for one second to save the new setting and exit.
FT-897/897D
1. Press and hold in the [F] key for one second to activatethe Menu mode.
2. Rotate the MEM/VFO CH knob to recall Menu Mode No-001 [EXT MENU], then rotate the DIAL to change the setting to "ON" to enable the extended Menu Mode.
3. Rotate the MEM/VFO CH knob to recall Menu Mode No-020 [CAT/LIN/TUN]. The default setting for this Menu is "CAT". Rotate the DIAL to change the setting to "TUNER".
4. Press and hold in the [F] key for one second to save the new setting and exit, then turn the transceiver off.
5. According to the operation manual, connect the RF and data connection between the tuner and transmitter. Do not set up the mAT-30 and FT-897 before changing the Menu Mode, item No-020 [CAT/LIN/TUN].
6. Press and hold in the [F] key for one second to activate the Menu mode.
7. Rotate the MEM/VFO CH knob to recall Menu Mode No-085 [TUNER/ATAS]. The default setting for this Menu is "OFF". Rotate the DIAL to change the setting to "TUNER".
8. Press and hold in the [F] key for one second to save the new setting and exit.
FT-450D
1. Press and hold in the [F] button for one second to enter the Menu Mode.
The "MENU" icon will appear in the display.
2. Rotate the [DSP/SEL] knob to select the Menu Item "TUNER".
3. Press the [DSP/SEL] knob to enable this selected Menu Item.
4. Rotate the [DSP/SEL] knob to change the setting to "EXT ATU".
5. Press and hold the [F] button for one second to return the normal operation.
OPERATION
1. Press the [TUNE] button briefly to acivate the Automatic Antenna Tuner.
The "TUNER" icon will appear in the display.
If the transceiver frequency is out of the amateur band, the "TUNER" icon will not appear.
2. Press and hold the [TUNE] button for one second to begin automatic tuning. The transmitter will beengaged, and the "TUNER" icon will blink while tuning is in progress.
3. Tuning will stop automatically when a low SWR is achieved. You may Press and hold the [TUNE] button for one second while tuning is in progress, to cancel the automatic tuning.
4. To disable the Automatic Antenna Tuner, press the [TUNE] button briefly again